How to set up and use a timer switch?
Introduction: The Benefits of Timer Switches in Modern Homes
Today's homes are not just personal living spaces but hubs of energy consumption. As energy costs rise and environmental concerns become more pressing, controlling energy use has never been more important. Timer switches offer an innovative solution to manage your home appliances and lighting, ensuring that energy is used efficiently and effectively.
What Is a Timer Switch? Understanding the Basics
A timer switch is a device that controls the operation of electrical equipment by automatically turning it on and off at specific times. It comes in two main varieties: mechanical and digital. Mechanical timer switches are often simpler, utilizing a dial to set the operation times. Digital timers, however, offer greater precision and options for programming.
How to set up a timer switch for light?
1. Choosing the Right Timer Switch: Determine whether you need a mechanical, digital, or smart timer switch. Mechanical timers have a dial and are often more basic, while digital and smart timers offer more programming options.
2. Turning Off Power: Before you begin, ensure that the power to the switch is turned off at your home's breaker box to avoid any risk of electric shock.
3. Removing the Existing Switch: Use a screwdriver to remove the faceplate and existing switch from the wall. Keep the wires exposed and ensure you remember which wire goes where.
4. Installing the Timer Switch: Connect the wires from the wall to the new timer switch as per the manufacturer's instructions. This usually involves connecting the black wires (hot), white wires (neutral), and green or bare copper wires (ground).
5. Securing the Timer Switch: Once wired, secure the timer switch in the wall with screws and cover with the faceplate.
6. Setting Up the Timer:
- For mechanical timers: Turn the dial so the current time is aligned with the pointer and press down the segments or pins for the times you want the lights to be on.
- For digital timers: Use the buttons to program the current time and then set the on/off times you desire. You may be able to set different schedules for different days if it's a programmable 7-day timer.
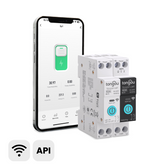
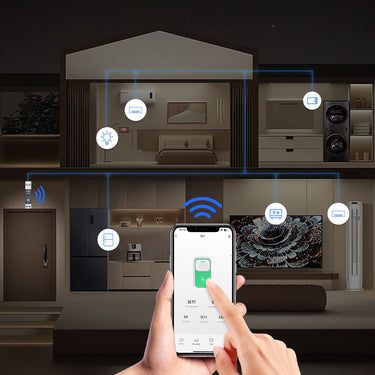
- For smart timers: Pair the timer with your smartphone using the required app, and set the schedules from your phone. Smart timers may offer the most flexibility and can be adjusted remotely.
7. Initializing the Timer: After the installation and setting up the schedule, restore power at the breaker box and test the timer switch to ensure it turns the light on and off at the programmed times.
8. Manual Override (if available): Some timer switches include a manual override, allowing you to operate the light independently of the set schedule. Familiarize yourself with how to activate this feature without disrupting the programmed settings.
Remember, each timer might have specific configuration steps, so always refer to the user manual for precise instructions. If you are not comfortable with electrical work, it's recommended to hire a professional electrician to perform the installation.
Relay modules can be designed with either normally open (NO) or normally closed (NC) switch configurations. In a NO switch setup, the switch remains open when the electromagnet is not activated and closes upon activation. On the other hand, an NC configuration works oppositely.
To ensure the relay module's longevity and prevent potential damage, components like flyback diodes are incorporated. These diodes protect against harmful flyback voltages that can arise when the electromagnet is deactivated. Additionally, optocouplers are sometimes used to offer higher levels of isolation between the control and load circuits.

How do you set a timer switch with pins?
Setting a timer switch that utilizes pins involves a simple and straightforward process. These types of timer switches often control outdoor or indoor lighting, pool pumps, or other appliances. They're mechanical and operate based on the physical positioning of pins around a dial. Here's how you can set one up:
Understand the Basics: The dial on the timer represents a 24-hour day. Each pin corresponds to a specific time interval, which might vary between models. Commonly, pushing a pin towards the center (or pulling it away from the center, depending on the model) activates the timer for the designated period.
Ensure Power is Off: Before adjusting the timer, make sure the power supply to the timer is turned off. This is a crucial safety step to prevent any electrical accidents.
Set the Current Time: Rotate the dial until the current time aligns with the indicator, usually a pointer or a specific mark on the timer. This step is essential for the timer to operate according to the actual time.
Programming the Timer:
Push or Pull Pins for ON/OFF Times: To set the timer for when you want the connected appliance or light to turn on, push the pins in or pull them out (depending on your specific model) at the desired start time. Do the same for the end time when you wish the device to turn off.
Multiple ON/OFF Cycles: If you need the device to turn on and off multiple times within the day, set additional pins accordingly.
Manual Override (Optional): Some timer switches have a manual override feature, allowing you to bypass the set times. This can be useful if you need the light or appliance to stay on or off outside the programmed times temporarily.
Final Check and Activation: Once you've set the pins for your desired ON and OFF times, double-check that the current time is still correctly set (in case the dial was inadvertently moved during programming). Then, turn the power back on to the timer.
Testing: After the power is on, observe the timer for at least one full cycle (24 hours) to confirm it turns the connected device on and off at the programmed times. Adjust the pins as necessary if any corrections are needed.
Remember, pin-based timer switches are relatively simple but offer less flexibility compared to their digital counterparts. However, they're usually more than adequate for basic scheduling needs, such as controlling outdoor lighting or pool pumps.
Lastly, although setting a timer switch with pins is generally safe and easy, always follow the specific instructions provided by the manufacturer of your timer switch model. If you're unsure or uncomfortable working with electrical devices, consider consulting a professional electrician.

How to use a timer plug?
Using a timer plug (also known as a plug-in timer) is a convenient way to automate the operation of electrical devices in your home, such as lamps, coffee machines, and other small appliances. These devices allow you to set specific times for power to be supplied to whatever is plugged into them. Here's how you can use a timer plug:
Read the Manual: First, familiarize yourself with your timer plug by reading the instruction manual. Different models may have unique features or settings.
Set the Current Time: For mechanical timer plugs, you’ll usually find a dial representing the 24-hour clock. Rotate the dial until the current time aligns with the designated marker or arrow on the timer. For digital timer plugs, use the buttons to set the current time, following the instructions provided.
Programming ON/OFF Times:
Mechanical Timers: These timers have pins or segments around the dial. Push down or pull up the pins for the times you want your device to turn on and off. Each pin or segment usually corresponds to a set period (e.g., 15 minutes). Ensure you've pushed or pulled the pins for all the times you want your appliance to be powered.
Digital Timers: Utilize the buttons to program specific on and off times. Many digital timers allow you to set multiple on/off cycles for different days of the week. Follow the instructions to select the correct times and save your settings.
Plug the Timer Into the Wall Outlet: Once you have programmed the timer, plug it into a suitable wall outlet. Ensure the outlet is switched on if it’s controlled by a wall switch.
Connect Your Device: Plug your device into the timer plug. It’s now ready to automatically turn on and off based on your settings.
Switch to “Timer” Mode: Some timer plugs have a switch or button that lets you choose between manual operation (your device can be turned on or off manually) and automatic operation based on your timer settings. Make sure it’s set to operate according to the timer.
Testing: After everything is set up, it’s a good idea to observe the timer for at least one cycle to ensure it turns your device on and off at the programmed times. If it doesn’t work as expected, double-check your settings.
Manual Override (Optional): Many timer plugs include a manual override function, allowing you to bypass the set schedule and manually control the power to your device. This feature is handy if you need to use your appliance outside the programmed times.
Remember to always ensure that the timer plug you are using is suitable for the appliance, especially in terms of electrical load. Some high-powered devices may require a timer plug rated for higher loads.
Lastly, timer plugs are an excellent way to save energy by ensuring devices are not left on unnecessarily, and they can offer convenience for tasks like waking up to freshly brewed coffee or falling asleep with a light on that will turn off automatically.
This type of transition allows for a seamless transfer of load between power sources by briefly connecting to both before disconnecting from the primary. It's mostly used in settings where zero downtime is absolutely essential.


